
.JPG)
RDMFC Open Weekend 2025

Where we fly !
- You are here:
-
Home Page

-
Learn to Fly
-
BMFA Certificates
- BMFA Certificates
BMFA Certificates
The BMFA operate a range of examinations or 'Certificates' to test your proficiency as an RC pilot. The relative activities you have to carry out are listed below.
Please go to the following BMFA link for more information regarding all the Achievement Schemes. click here
The examination for an ‘A’ Certificate may be taken on application to a Registered Fixed Wing or Helicopter Examiner. The candidate must successfully carry out the following flying test and reference to the Guidance Notes is very strongly recommended:
- Carry out pre-flight checks as required by the BMFA Safety Codes.
- Take off and complete a left (or right) hand circuit and overfly the take-off area.
- Fly a ‘figure of eight’ course with the cross-over point in front of the pilot, height to be constant.
- Fly a rectangular circuit and approach with appropriate use of the throttle and perform a landing on the designated landing area.
If the engine stops during the landing the model may be retrieved and the engine restarted to enable the remaining parts of the test to be completed. - Take off and complete a left (or right) hand circuit and overfly the take-off area
- Fly a rectangular circuit at a constant height in the opposite direction to the landing circuit flown in (d).
- Perform a simulated deadstick landing with the engine at idle, beginning at a safe height (approx. 200 ft) heading into wind over the take-off area, the landing to be made in a safe manner on the designated landing area.
- Remove model and equipment from take-off/landing area.
- Complete post-flight checks required by the BMFA Safety Codes.
All manoeuvres must be carried out in front of the pilot and, depending on the wind direction, (c), (d) and (f) may be flown as shown in the accompanying drawing.
The above schedule is treated as one test flight and must be completed in one attempt. Two attempts per examination will be allowed in any one day.
Exceptionally if, in the opinion of the Examiner, either the configuration of the model or the surface of the flying area is such that a rolling take-off would not be possible, hand launches may be permitted.
In addition to the flying schedule, the candidate must answer correctly a minimum of five questions on safety matters, based on the BMFA Safety Codes for General Flying and local flying rules.
Please go to the following BMFA link for more information regarding all the Achievement Schemes. click here
The examination for a ‘B’ Certificate may be taken on application to a Registered Examiner. The examination may be carried out by:
(a) A Chief Examiner (fixed-wing qualified)
(b) Two Registered Examiners (the ‘lead’ Examiner must be fixed-wing qualified).
If your club does not have any Registered Examiners, does not have enough Examiners or has any problems with co-ordinating the work of your existing Examiners you should contact your local Area Achievement Scheme Co-ordinator who will be able to help. Names and telephone numbers of Area Achievement Scheme Co-ordinators are available from your Area Secretary or from the BMFA Leicester office.
The candidate must successfully complete the following flying tests and reference to the Guidance Notes is very strongly recommended:
- Carry out pre-flight checks as required by the BMFA Safety Codes.
- Take off and complete a left (or right) hand circuit and overfly the take-off area.
- Fly a ‘figure of eight’ course with the crossover point in front of the pilot, height to be constant. This manoeuvre must be flown more accurately than the similar manoeuvre in the ‘A’ certificate test.
- Fly into wind and complete one inside loop.
- Fly downwind and complete one outside loop downwards from the top (i.e. a bunt).
For aircraft (scale aircraft specifically) which for reasons of structural strength or control limitations cannot perform an outside loop, a Split S or Reversal (from level flight, half roll to inverted, hold, then pull through half loop to recover in level flight) may be accepted by the Examiner. - Complete two consecutive rolls into wind.
- Complete two consecutive rolls downwind using the opposite direction of roll rotation to that used in (f) above.
- Complete a stall turn either left or right.
- Gain height and perform a three turn spin. For aircraft which will not spin, a spin attempt resulting in a spiral dive (not necessarily of three turns), will be acceptable. In each case the initial heading and the recovery heading must be into wind and the model must fall into the spin (no ‘flick’ spin entry).
- Fly a rectangular landing approach and overshoot from below 10 ft. Note that this manoeuvre is an aborted landing, not a low pass.
- Fly a rectangular circuit in the opposite direction to that in (j) at a constant height of not more than 40 feet.
- Fly a rectangular landing approach and land (wheels to touch within a pre-designated 30 metre boundary).
- Complete post-flight checks as required by the BMFA Safety Codes.
Parts (d),(e),(f),(g),(h) and (i) must be performed in airspace designated by the examiner prior to the test flight. The schedule must be completed in one flight.
Exceptionally, at a pre-determined point in the flight an intermediate landing may be permitted for the sole purpose of refuelling or the fitting of a freshly charged flight battery. This landing may only be made with the prior consent of the Examiners. Two attempts per examination will be allowed in any one day.
All manoeuvres must be carried out in front of the pilot.
Depending on the wind direction, (j), (k) and (l) will be flown as EITHER left hand overshoot circuit, right hand rectangular circuit, left hand landing circuit OR right hand overshoot circuit, left hand rectangular circuit, right hand landing circuit.
In addition to the above flying schedule, the applicant must answer satisfactorily a minimum of eight questions on safety matters based on the BMFA Safety Codes for General Flying and Model Flying Displays and local flying rules.
GUIDANCE FOR CHIEF EXAMINERS, CLUB EXAMINERS and TEST CANDIDATES
THE ‘A’ CERTIFICATE
(HELICOPTER)
ISSUE 3 - OCTOBER 1998
General
Please go to the following BMFA link for more information regarding all the Achievement Schemes. click here
The ‘A’ certificate is a measure of flying ability and safety which ‘may be equated to a safe solo standard of flying’ and an increasing number of clubs use it as their ‘safe solo’ test. As an examiner, the level of competence you should expect of a candidate should be based on that criterion; that is, is this person, in your opinion, fit to be allowed to fly unsupervised?
A pilot capable of flying to ‘B’ certificate standards and wishing to go straight to the Helicopter ‘B’ test without taking the ‘A’ test may do so but candidates should on no account be forced along this path. A flyer, known within a club to be a good pilot, going through the ‘A’ before taking the ‘B’ can be an excellent example to the rest of the club members and this should be pointed out to any candidate wishing to go direct to the ‘B’.
The candidate should have studied the BMFA handbook and be familiar with the ‘Safety code for general flying’ as well as the ‘Operational guide, ‘all models’, ‘radio control’ and helicopter’’ sections. Besides being an excellent guide to the safe flying of helicopters and other model aircraft, most of the questions asked at the end of the test will be from these sections of the handbook
The Model
The test can be performed with virtually any model helicopter, fixed pitch or collective. The helicopter may be internal combustion engine or electric motor powered.
Gyros
It is acceptable to use an electro-mechanical or solid state gyro in any helicopter being used to take the test although electronic stabilisation is restricted to a single sensor acting in rotation around the yaw axis only.
This allows a range of gyros to be fitted, from simple yaw dampers to solid state heading lock units but only acting on the tail rotor.
The use of any autopilot and/or artificial stability features which are (or may be) designed into such units beyond the definition above is not acceptable during the test.
Height and Speed
The ‘A’ certificate candidate should be a reasonably confident pilot, even though they may have been flying helicopters for only a few months. Flying too high or too low is not the mark of a confident pilot. The test should be flown at the heights specified in the individual elements with little deviation.
The two manoeuvres in the ‘A’ certificate test require slightly different speeds as will be explained on the manoeuvre descriptions.
Consistency
The candidate must ensure that the model stays at a reasonably constant height and heading and moves at a constant speed through the manoeuvres as required. All deviations from steady and well controlled flight should be noted as they will form part of your examiner’s judgement of the test flight. Good use of the controls to maintain a constant height throughout the test is something you must watch carefully for.
Slight variations of height and failure to fly spot-on lines are not necessarily reasons to fail the candidate on their own, but they do give an indication of the pilot’s general level of competence and should influence your final decision.
Very poor height control or significant failures to hover with the tail held in the correct direction are a sure sign that the pilot has not practised the test and are legitimate reasons to fail the candidate.
Continuity
The manoeuvres are set out in such a way that they are flown one after the other as a short sequence. You should discuss with the candidate before the flight the way in which you would like the various elements flown and the candidate should have a good knowledge of the test before the event. If the candidate is very hesitant during the test and is not capable of following the set sequence then you might conclude that they have either not had enough practice or that their basic flying skills are not yet well enough developed.
Trim
It is expected that the candidate will start the test with a model that has been trimmed out previously . If you see obvious signs that the model is out of trim and the candidate makes no attempt to rectify the matter, you may well question their basic competence.
On the other hand, if they do need to re-trim and are making attempts to do so, you should make allowances for a short time of flight with a somewhat erratic path. This should not be penalised unless it puts the model in any dangerous situations or unless the model flies behind the pilot or into any other unsafe area. If the pilot does use the first part of the flight as a trimming exercise, they should be required to land as soon as they are satisfied with the trim and the test should then commence at manoeuvre (b). If a flight is abandoned prior to starting manoeuvre (b) because of trim problems it will not count as a test flight attempt.
Nerves
Quiet competence is what you are looking for during the flight, but most candidates may well be nervous, and you should make some allowance for this. If the flyer is very nervous you should seriously consider abandoning the test for the time being and arranging a coaching flight or two for the candidate to settle them down before re-taking the test. This can be done on the same day and can really help those candidates who have trouble with nerves when flying in a test situation.
Repeating Manoeuvres
At ‘A’ certificate level, the manoeuvres are simple and the candidate should be competent to fly them with very few errors. If you identify any major faults, the test should be taken again. It may be, however, that the candidate will make minor mistakes on a manoeuvre and if you are not fully satisfied with what you have seen you should not hesitate to ask for the manoeuvre to be repeated.
Some judgement is called for on your part here. The idea is not to let the candidate have two or three attempts at each manoeuvre until they get it right, but more to give you the best chance of assessing the competence of the pilot you are testing.
You should consider what you have seen the model do, and if you think to yourself, ‘that could be better’, then request that the manoeuvre be repeated. Beware of doing this too often, though, as you would be degrading the worth of the test and it must not degenerate into a series of practice manoeuvres.
Repeating the test
The rules allow two attempts at the test in one day and if the candidate fails the first of these you must consider their performance in deciding what to do next. Many failures will be reasonably good or borderline cases and in these circumstances it may be appropriate to arrange one or two coaching flights before repeating the test. Remember that many of the candidates will be unfamiliar with flying under pressure and might do very well on the second test.
However, it will probably be obvious to you on many occasions that the pilot you are testing is simply not ready for the test they are taking. In this situation it is better that you tell them so quite clearly. It could then be extremely useful for you to arrange a demonstration test for them so that they can gain an understanding of the standard of flying that is required, especially if they are not clear about the manoeuvres and the positioning for them. This, possibly with a little coaching, is far more useful to everyone than simply telling the candidate that they have failed.
Another possibility that may occur during a test is an engine failure part way through which, with helicopters at this standard, could very well lead to a damaged model. The rules are that the test should be performed in one flight, so if this happens you cannot let the candidate go up again and continue where they left off.
In this case you should certainly offer them another ‘A’ certificate test flight but you must make sure that they have had enough time to sort out what the problem was and to thoroughly check the model for any possible damage. Under no circumstances let them go straight into another ‘test’ flight without having a preliminary proving flight so that you are both sure that the problem has been solved and that the model is airworthy.
How they handled the first emergency and how thoroughly they checked over the model for possible damage may also be of interest to you!
A flight which is abandoned for any reason prior to starting manoeuvre (b) will not count as a test flight attempt.
Ground Positioning
It is a requirement that ‘all manoeuvres are carried out in front of the pilot’. For all of the helicopter ‘A’ test, the pilot will be facing into wind and standing a comfortable distance (which they will choose) downwind of the take-off point and the model will always be upwind of them.
The candidate will have to choose the spot for their ‘take-off and landing pad’. There is no laid down size for such an area but you should expect all take-offs and landings to be confined to within a metre or so of the selected spot. Most importantly, the candidate should select a spot which is a safe distance from the pits area and which will not cause overflying of other pilots, spectators or pits areas during the test.
If their original choice is bad in this respect but they quickly realise the problem and ask to re-position before starting the test they should not be penalised. If they start the test from a poor position and try to work around the problem then you should stop the test and offer a re-try under the terms of ‘Repeating the Test’ above.
Administration
There are separate forms for Examiners to use during the Helicopter ‘A’ test, but if you do not have one then the fixed wing ‘A’ form may be used but it is essential that parts 1 and 2 (and 3 if you have old paperwork) of the ‘pass form’ are clearly and separately marked by you with the word ‘HELICOPTER’.
Forms should wait no longer than a month before being sent in to the Controller. You should take great care that all the details are filled in correctly, especially the successful candidates NAME and, if possible, their BMFA number (this can save a great deal of confusion). This is very important as what is seen on the pass form is what will appear on the final certificate. It is embarrassing for you to have to send one back to be re-done and it gives the candidate a definite impression of sloppy work by someone
The Test
(a) Carry out pre-flight checks as required by the BMFA safety codes.
The pre-flight checks are laid out clearly in the BMFA Members’ Handbook. The candidate should also go through the pre-flying session checks, also laid out in the Handbook. Ask the candidate to go through their checks as if the test was their first flight of the day.
Points to look for are that the candidate has a steady and regular ground routine, especially when starting and tuning the engine. Nerves should not play a part in the pits, and you should satisfy yourself that the candidate is in full control of what they are doing whilst preparing the helicopter for flight.
A tidy flight box and a neat ground layout makes a good impression but bear in mind that that ‘A’ certificate candidates may not have been flying for too long and you should make allowances.
A poor performance in this area is not direct grounds for failing the candidate but can certainly be part of a cumulative fail if other aspects of the performance are below the standard you expect.
Pay particular attention to the way the candidate uses the local frequency control system and make sure they understand it and use the correct sequence of ‘get the peg, Tx on, Rx on’. Watch carefully and take note that the transmitter controls, trims and switches are checked carefully by the pilot. You should also specifically look for the candidate to positively check that the idle-up switches are not set to on.
Any candidate who switches on their radio before checking the frequency control system must be failed on the spot.
It is important that the candidate is seen to hold the rotor head securely during the starting procedure and until the model is past the flight line. If there is no one else available then there is nothing to stop you aiding the candidate by carrying the model to the test pad etc. but any such actions must be performed by you directly on the instructions of the candidate. You must not prompt them or carry out any actions of your own accord. Talk these points over with the candidate in you pre-flight briefing.
(b), (c), (d), (e) and (f) together form a horizontal ‘L’.
During the course of manoeuvres (b), (c), (d), (e) and (f) the model should not have deviated significantly from a straight line drawn between the end points Slight drifting may be permissible in adverse wind conditions, but should be rapidly corrected and put back on the correct course. If the deviation is severe, or the model does not follow the line at all, the candidate should not pass. The hovering speed between the end points is at the discretion of the candidate but must be no faster than a slow walk.
Each stop should be a controlled hover, with any movement being quickly checked, without signs of large over corrections. The pauses at each hovering point should be approximately fifteen seconds and they should be estimated by yourself as you observe the flying. When you are satisfied that the hover time has been completed at each point you should indicate to the candidate to move on.
The height of the helicopter should be consistent throughout these manoeuvres with no major deviations.
(b) Take off and hover tail in over the take-off point, with the helicopter skids at eye level, for approximately fifteen seconds
Take off should be smooth and the lift to eye level should be vertical, straight and controlled with the model a comfortable and safe distance in front of the pilot. Once at eye level the model should remain stationary, and the tail should not oscillate unduly. You should notify the candidate when the standard hover time of approximately fifteen seconds has passed and ask him to commence with the next part of the manoeuvre.
(c) Hover the helicopter slowly sideways, either to the left or right, for approximately five metres, stop, and hover briefly.
The pilot may choose to perform the hover in either direction (to his left or right) but must state in which way he intends to go prior to starting to move. Once you have been told the direction, the candidate should, without turning the model, commence a sideways hover at eye level for a distance of approximately five metres. Having travelled about five metres the pilot will stop the model and hold it in a steady hover at eye level and, with the tail pointing in the same direction as it was when it took off, for the standard hover time.
(d) Hover the helicopter slowly sideways in the opposite direction to bring it back to its original position in front of the pilot, stop, and hover briefly.
At the end of the hover time the pilot, without turning the model, will hover it sideways in the opposite direction returning to a point over the spot at which it initially took off. At this point the pilot will once again stop and hover the model with it still facing in the same direction as it was at take-off.

(e) Fly slowly forwards for approximately five metres, stop, and hover briefly.
After the standard hover time and on your command, the pilot now hovers the model forward, at the same pace at which he did the sideways manoeuvres, for a distance of about five metres then stopping and hovering steadily. All the previous comments about line, height at eye level, speed and steadiness apply and the orientation of the model should still be facing into wind as for all the rest of the first set of manoeuvres.
(f) Fly slowly backwards, bringing the helicopter back to its original position over the take-off point, stop, hover briefly and land.
After the standard hover time and on your command, the model is hovered backwards (without turning it) to the start position, stopped and hovered for the standard time above the landing pad with skids at eye level. After the hover time has been completed the model should descend and land close to the original take off point. During this last section, you will be observing the same criteria as previously and the model should have performed as before in relation to the course and at a similar speed. The descent and landing should be smooth and steady with little oscillation of the tail on touch down caused by poor tail control.
Special Note
Although the ‘A’ certificate (Helicopter) schedule is short enough to be flown by most electric powered helicopters on one charge, this may not always be so, especially if the pilot has a trim problem to sort out early in the flight.
If the pilot wishes to change battery packs then this is the place in the test to do it. The model should be carried back to the pits and returned to the take-off point as quickly as possible, taking no more than a minute or so. The pilot is not be allowed to re-charge batteries part way through the test, they can only replace the pack.
(g) Take off and hover briefly, turn sideways either left or right and fly forwards to perform two ‘lazy eights’, each at least 30 metres in length. Each time the model passes in front of the pilot it must be sideways on.
The pilot should check that the area he intends to overfly is clear and that no other models are flying in the near vicinity; you should be watching for definite head movements as they scan the area.
The pilot should fly this manoeuvre at a safe height above eye level, but should not fly at such a height that the model cannot be clearly seen by both the pilot and yourself. Between eye level and five metres is the correct height band for this part of the test and the model should hover through the lazy eights, not fly through them. The pilot must be clear about the height at which they wish to fly before they take-off and you should discuss this with them in the pre-flight briefing.
The pilot having ensured it is safe to do so, the model takes-off, rises smoothly to the flight level previously selected and hovers for the standard time. The pilot then turns the model 90o, either left or right and, at the same time, slowly moves off forward at about a fast walking pace (but still in the hover). It is not required that the 90o turn is completed before the model accelerates; the turn and acceleration may be one smooth manoeuvre although the pilot may treat them as separate manoeuvres if they wish.
The pilot moves away at his chosen height for a distance of about fifteen metres where they begin a turn into wind, continuing the turn smoothly through 180o and bringing the model back across in front of them. Without hesitation the model continues at the same speed in the new direction until it has flown past the pilot for a further fifteen metres to his opposite side. At this point he smoothly executes another turn into wind for 180°, causing the model to be now moving in the same direction as the first leg, again hovering across in front of the pilot.
The model does not stop at this point but it then repeats the events of the first lazy eight until two full eights have almost been completed and the model is approaching the take-off/landing area.
During the lazy eights, you will be looking for a safe controlled flight throughout. The candidate should not lose or gain height significantly on the turns and should hover in a straight line between the turns with only sufficient drift on the model to prevent the it from moving either further away or, more dangerously, closer to himself during each leg of the manoeuvre. The overall length of each eight should be at least thirty metres and the model must be sideways on to the pilot each time it passes across their front. Some allowance can be made for a strong or gusty wind, for instance in any significant wind the model will be slightly tail in as it passes in front of the pilot to allow for drift, but the basic points of the manoeuvre must still be demonstrated.
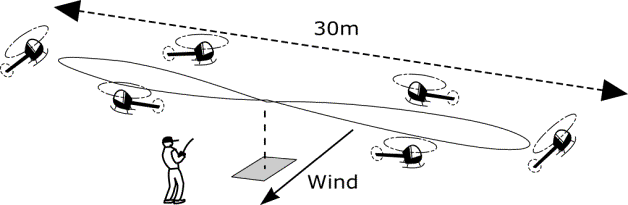
The turns should be made by use of cyclic and rudder co-ordinated correctly, and must not be half pirouettes at the end of each leg. The flight pattern should be as the diagram in the BMFA Members’ Handbook and not deviate significantly from it. The pilot should be equally competent to the left and to the right when flying this manoeuvre, that is, turning left into wind or turning right into wind. If any significant difference in their flying skills shows up here then you should seriously consider whether they show the degree of competence necessary. It should be borne in mind that the manoeuvres in the test have been made reasonably simple, so that a fairly high degree of control can be demanded.
(h) At the conclusion of the ‘lazy eights’, bring the helicopter to a halt above the original take-off point, hover briefly and land.
At this point the model should be approaching the area of the landing pad, still at the chosen manoeuvre height, and the pilot should aim to smoothly decelerate the model, at the same time turning the it into wind and stopping the model in front of himself, still at the chosen height and approximately over the landing area. After hovering there for the standard time, the model should then descend smoothly and land. The pilot may perform the stop and turn into wind as two separate manoeuvres if they wish although this is not a requirement.
After landing, the candidate should shut down the engine and allow the rotor blades to stop turning before collecting the model to return to the pits.
(i) Complete post flight checks as required by the BMFA Safety Codes.
These are clearly set out in the BMFA Members’ Handbook, but you should pay particular attention to the correct Rx off, Tx off sequence and watch carefully to see that the frequency control system in use is cleared correctly.
The Questions
The candidate then ‘must answer correctly a minimum of five questions on safety matters, based on the BMFA Safety Codes for General flying and local flying rules’.
How many questions you ask will depend on the circumstances at the time. For instance, if the candidate has done a good flying test and answers the first five questions with confidence then you need go no further. An acceptable test but with some rough edges can be offset to an extent by the candidate performing well in the first five questions.
A candidate who has done a test which you found only just acceptable and who hesitates on the questions should be asked a few more than five questions and if you are still not satisfied that they have actually read the safety codes, you should no hesitate to fail them.
The achievement scheme is a test of both flying ability and knowledge. It does not matter how well the candidate can fly, if they are unable to answer the safety questions they should not pass.
There is some debate as to whether a list of ‘approved’ questions should be published for examiners to use. Current opinion is that if such a list is published then candidates will also be able to study the list, and will not need to study the BMFA handbook. This is probably not a good idea.
As an examiner, however, you should prepare yourself thoroughly for any testing that you do, and you are encouraged to sort out a personal list of suitable questions. Do not forget that you can call upon any local rules which you are aware of and that the candidate should know. If you do compile a personal list of questions, do not let the candidate see them.
Remember that the majority of the questions you ask are to be BASED on the BMFA safety codes; you are not expected to ask them ‘parrot fashion’ and the candidate is not expected to answer in that manner either.
This opens up the possibility of asking the candidate if they can think of reasons behind specific rules, for instance, why is the club frequency control system operated as it is and what could go wrong? ; why should models not be hovered out of or into the pit area?
Issue 1 - Ratified by Areas Council, 7th October, 1995.
Issue 2 - Ratified by Areas Council, 18th October, 1997.
Issue - 3 Ratified by Areas Council 17th October, 1998
THE ‘B’ CERTIFICATE
(HELICOPTER)
Please go to the following BMFA link for more information regarding all the Achievement Schemes. click here
ISSUE 3
The ‘B’ certificate is ‘designed to recognise the pilot’s more advanced flying ability and a demonstrated level of safety suitable for flying at a public display’. As an examiner, the level of competence you should expect of a candidate should be based on the question; ‘has this person demonstrated their flying ability to me in a satisfactory manner, and how do I feel about them appearing in public, possibly at a large display, on the strength of the certificate which I may be about to award them?’
For many years the ‘B’ certificate has been seen as a ‘display licence’ but, in fact, it has always been much more than that. It was set up in the first place as a method of encouraging club flyers to gain further flying skills by meeting and being tested to a recognised national standard.
Whilst it certainly has its uses in the context of display pilots, the real aim of the ‘B’ certificate has always been to give the club flyer a personal attainment goal beyond the ‘A’ certificate ; a level of competence and safety which is attainable by the average pilot with a little thought and practice.
The long term strategy behind this is that if enough club flyers qualify for their ‘B’ certificates then the general standard of flying both within your club, and nationally cannot help but rise. Examiners should be pressing this concept positively within their clubs and discouraging the idea of the ‘B’ certificate of being just a ‘display licence’.
A pilot capable of flying to ‘B’ certificate standards and wishing to go straight to the Helicopter ‘B’ test without taking the ‘A’ test may do so but candidates should on no account be forced along this path. A flyer, known within a club to be a good pilot, going through the ‘A’ before taking the ‘B’ can be an excellent example to the rest of the club members and this should be pointed out to any candidate wishing to go direct to the ‘B’.
The candidate for the ‘B’ certificate should have studied the BMFA Members’ Handbook and be familiar with the ‘Safety Code for general flying’ as well as the ‘operational guide, ‘all models’, ‘radio control’ and ‘helicopters’. Besides being an excellent guide to the safe flying of helicopters and other model aircraft, most of the questions asked at the end of the test will be from these sections of the Handbook.
The Model
The test can be performed with virtually any model helicopter , fixed pitch or collective. The helicopter may be internal combustion engine powered or electric powered. The flight time required may be marginal for electric but a change of battery packs part way through the test is allowable.
On no account may the candidate use defects or limitations in the performance of the model as an excuse for poor performance on their part. You should make no allowance on this point; the selection of the model to do the test is the responsibility of the pilot and it is they you are testing, not the model. Similarly, the type of model presented cannot be used as an excuse for not completing certain manoeuvres.
Gyros
It is acceptable to use an electro-mechanical or solid state gyro in any helicopter being used to take the test although electronic stabilisation is restricted to a single sensor acting in rotation around the yaw axis only.
This allows a range of gyros to be fitted, from simple yaw dampers to solid state heading lock units but only acting on the tail rotor.
The use of any autopilot and/or artificial stability features which are (or may be) designed into such units beyond the definition above is not acceptable during the test.
Height and Speed
The ‘B’ certificate candidate should be a confident pilot, and this should show in the height and speed at which they fly the test. The hovering parts of the test should be flown with the skids at eye level. The flying sections should typically be completed at a height of between ten and twenty five metres (roughly one to two houses high). The pilot should show good use of the controls to maintain a constant height throughout each of the separate elements of the test and transitions between various heights should be smooth and steady. Height selection and accurate height control are factors you should attach some importance to.
Consistency
Good use of the controls should ensure that the model stays at a constant height, and moves at a steady speeds suitable to each of the separate elements of the test. All deviations from these constants should be noted, and will form part of the judgement of the test.
Unnecessary varying of height and inconsistent lines are valid reasons to fail a candidate at this level as they give a good indication of the flyer’s general level of competence and they must strongly influence your final decision. Poorly flown height or lines are a sure sign that the flyer has either not practised the test or has not reached the required standard of flying and are legitimate reasons to fail them.
Continuity
The manoeuvres are set out in such a way that they are flown one after the other as a sequence. You should discuss with the candidate before the flight the way in which you would like the various elements flown and the candidate should have a good knowledge of the test before the event. If the candidate is very hesitant during the test and is not capable of following the sequence then you might conclude that they have either not had enough practice or that their basic flying skills are not yet well enough developed.
Although the manoeuvres are set out as a sequence, it is ABSOLUTELY NOT expected that they will be flown as a schedule with one manoeuvre flowing into the next. The candidate may opt to fly the test in that manner but that is their choice. Most flights will have a combination of transitions and positioning circuits between the various elements and you should note any additional flying for positioning etc., just as carefully as the rest of the flight, as this can say much about the competence of the pilot.
A pilot who transitions directly from one manoeuvre to the next is not to be penalised as this is quite acceptable, but watch out for the pilot who is not sufficiently practised. Flying some of the manoeuvres in this manner can get them into some very awkward positions. The candidate should have a good knowledge of the test before the event.
It should be possible to fly the test on one tank of fuel but If, very exceptionally, the model does have to be refuelled then the pilot should clear this with you before the test starts. It is allowable only once during the test, as is changing the batteries in an electric powered model, and anything the pilot does during this time must be considered by you to be part of the test. This includes the way they land, retrieve, use correct refuelling procedures, re-start, carry out and take-off.
Trim
It is expected that the candidate will start the test with a model that has been trimmed out previously but, if necessary, they should be able to trim the model out relatively quickly. If you see obvious signs that the model is out of trim and the candidate makes no attempt to rectify the matter, you may well question their basic competence.
On the other hand, if they do need to re-trim and are making attempts to do so, you should make allowances for a short time of flight with a somewhat erratic path. This should not be penalised unless it puts the model in any dangerous situations or unless the model flies behind the pilot or into any other unsafe area. If the pilot does use the first part of the flight as a trimming exercise, they should be required to land as soon as they are satisfied with the trim and the test should then commence at manoeuvre (b). If a flight is abandoned prior to starting manoeuvre (b) because of trim problems it will not count as a test flight attempt.
Nerves
Quiet competence is what you are looking for during the flight, but most candidates may well be nervous and you should make some allowance for this. If the flyer is very nervous you should seriously consider abandoning the test for the time being and arranging a coaching flight or two to settle the candidate down before re-taking the test. This can be done on the same day and can really help those candidates who have trouble with nerves when flying in a test situation.
Repeating Manoeuvres
At ‘B’ certificate level the candidate should be competent enough to fly the test with very few errors. If you identify any major faults, the test should be taken again. It may be, however, that the candidate will make minor mistakes on a manoeuvre and if you are not fully satisfied with what you have seen you should not hesitate to ask for the manoeuvre to be repeated.
Some judgement is called for on your part here. A major mistake is grounds for failing the candidate, especially if loss of control or a dangerous situation occurs. you should definitely not let the candidate have two or three attempts at each manoeuvre until they get it right, but you must give yourself the best chance of assessing the competence of the pilot you are testing.
You should consider what you have seen the model do, and if you think to yourself ‘that could be better’ than a request that the manoeuvre be repeated is probably justified. Be extremely careful about using this option, however, as you could degrade the worth of the test. Under no circumstance must the test degenerate into a series of practice manoeuvres.
Repeating the test
The rules allow two attempts at the test in one day and if the candidate fails the first of these you must consider their performance in deciding what to do next. Many failures will be reasonably good or borderline cases and in these circumstances it may be appropriate to arrange one or two coaching flights before repeating the test. remember that many of the candidates will be unfamiliar with flying under pressure and might do very well on the second test.
However, it will probably be obvious to you on many occasions that the pilot you are testing is simply not ready for the test they are taking. In this situation it is better that you tell them so quite clearly. It could then be extremely useful for you to arrange a demonstration test for them so that they can gain an understanding of the standard of flying that is required, especially if they are not clear about the manoeuvres and the positioning for them. This, possibly with a little coaching, is far more useful to everyone than simply telling the candidate that they have failed.
Another possibility that may occur during a test is an engine failure part way through which could very well lead to a damaged model. The rules are that the test should be performed in one flight, so if this happens you cannot let the candidate go up again and continue where they left off.
In this case you should certainly offer them another test flight but make sure that they have had enough time to sort out what the problem was and to thoroughly check the model for any possible damage. Under no circumstances let them go straight into another test flight without having a proving flight so that you are both sure that the problem has been solved and that the model is airworthy.
How they handled the first emergency and how thoroughly they checked over the model for possible damage may also be of interest to you!
Note that the possibility exists of a refuelling stop as covered in ‘Continuity’ above. This is treated differently to an engine failure but ONLY if cleared with you before the test starts.
A flight which is abandoned for any reason prior to starting manoeuvre (b) will not count as a test flight attempt
Ground Positioning
The candidate will have to choose the spot for their ‘take-off and landing pad’. There is no laid down size for this area but you should expect all take-offs and landings to be confined to within a metre or so of the selected spot. Most importantly, the candidate should select a spot which is a safe distance from the pits area and which will not cause overflying of other pilots, spectators or pits areas during any part of the test.
If their original choice is bad in this respect but they quickly realise the problem and ask to re-position before starting the test they should not be penalised. If they start the test from a poor position and try to work around the problem then you should stop the test and offer a re-try under the terms of ‘repeating the test’ above.
It may help the pilot considerably if a ten metre square is marked on the ground around the landing pad, one side of it aligned into wind. If this is done then the landing pad will be at the centre of the square and the pilot will generally stand midway along the downwind edge of the square, facing into wind.
General Manoeuvres and Hovering
All take-offs and landings should be smooth, without undue tail oscillations, and lifts and descents should be straight and controlled with the model a comfortable and safe distance in front of the pilot. In any stationary hovering the model should remain steady and the tail should not oscillate unduly.
The standard ‘brief’ hover time should be between five and ten seconds and is at the discretion of the pilot. You should discuss this with the candidate before the test so that they know that you will want to see a positive stop with the hover long enough to show that the model is well controlled and steady with little wandering or oscillation. They should also be aware that the decision to move on is theirs and that you will not be asking them to commence with the next manoeuvre.
Circuit and other ‘flying’ manoeuvres should be performed at the heights mentioned in ‘Height and Speed’ above.
It is a requirement that ‘all manoeuvres are carried out in front of the pilot’. In all other PAS tests the pilot will be generally be standing in one position and consistently facing one way. This does NOT apply to the helicopter ‘B’. In some of the hovering manoeuvres the pilot will be facing into wind with the model in front of them whilst in the circuit and flying manoeuvres the pilot will be facing crosswind with the model flying in positions similar to a fixed wing model. The pilot’s position is important and they should convince you by their actions that they have given the matter some thought.
Care should be taken in the flying manoeuvres that the line of approach and height each time is consistent and you should take particular note of performance in this area.
Administration
There are separate forms for Examiners to use during the Helicopter ‘B’ test, but if you do not have one then the fixed wing ‘B’ form may be used but it is essential that parts 1 and 2 (and 3 if you have old paperwork) of the ‘pass form’ are clearly and separately marked by you with the word ‘HELICOPTER’.
Forms should wait no longer than a month before being sent in to the Controller. You should take great care that all the details are filled in correctly, especially the successful candidates NAME and, if possible, their BMFA number (this can save a great deal of confusion). This is very important as what is seen on the pass form is what will appear on the final certificate. It is embarrassing for you to have to send one back to be re-done and it gives the candidate a definite impression of sloppy work by someone
The Test
(a) Carry out pre-flight checks as required by the BMFA Safety Codes.
The pre-flight checks are laid out clearly in the BMFA Members’ Handbook. The candidate should also go through the pre-flying session checks, also laid out in the handbook. Ask the candidate to go through their checks as if the test was their first flight of the day.
Points to look for are that the candidate has a steady and regular ground routine, especially when starting and tuning the engine. Nerves should not play a part in the pits, and you should satisfy yourself that the candidate is in full control of what they are doing whilst preparing the helicopter for flight.
A tidy flight box and a neat ground layout makes a good impression and is to be expected from ‘B’ certificate candidates.
A poor performance in this area is not direct grounds for failing the candidate but it is inevitable that you will be making mental notes of all aspects of the candidates performance and this is one that may have an effect on a real ‘borderline’ case.
Pay particular attention to the way the candidate uses the local frequency control system and make sure they understand it and use the correct sequence of ‘get the peg, Tx on, Rx on’. Also watch carefully that and take note that the transmitter controls, trims and switches are checked carefully by the pilot. You should specifically look for the candidate to positively check that the idle-up switches are not set to on.
Any candidate who switches on their radio before checking the frequency control system must be failed on the spot.
It is important that the candidate is seen to hold the rotor head securely during the starting procedure, and until the model is past the flight line. If there is no one else available then there is nothing to stop you aiding the candidate by carrying the model to the test pad, etc., but any such actions must only be performed by you directly on the instructions of the candidate, you must not prompt them or carry out any actions of your own accord. Talk these points over with the candidate in you pre-flight briefing.
(b) Perform one hovering ‘M’
The helicopter takes off from a position five metres in front of the pilot and climbs to eye level, where it hovers briefly. The helicopter, without turning, is then hovered diagonally backwards to a point level with the pilot and five metres to one side and again hovers for a brief period. The model is then hovered forward for ten metres where it again stops and hovers briefly. The pilot then hovers the model, without turning it, sideways for ten metres so that it passes in front of the pilot, ending five metres to the other side of the pilot and ten metres in front. After another brief hover the model moves backwards, without turning, to a point level with and five metres to one side of the pilot where it once more hovers briefly. The model now hovers diagonally forwards toward the original take off point and hovers briefly above the take off point before landing on the original take off pad.
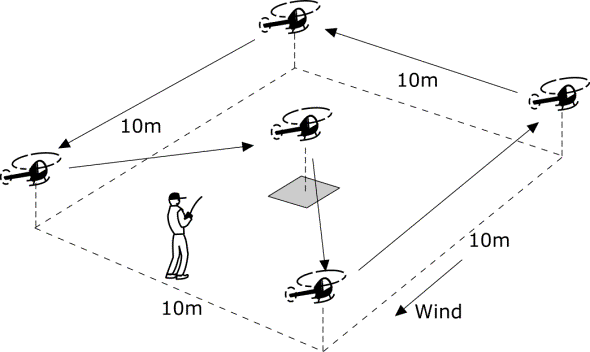
All movements are in a straight line and at a constant speed and are carried out with the skids level with the pilot’s eyes. The pilot will find that the previously mentioned ‘ten metre square’ will be most useful (see ‘Ground Positioning’).
It is important to be satisfied that the pilot is in full control whilst hovering both to their left and right. Ideally their feet should remain facing into wind and they should not turn to face the helicopter, but should look at it over their shoulder.
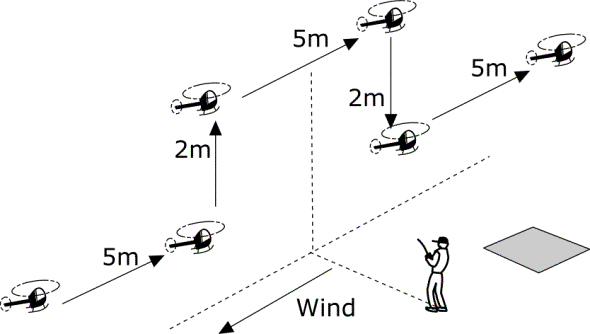
(c) Perform one ‘Top Hat’
The pilot should now turn to face crosswind and should hover the model to a position about ten metres out and fifteen metres downwind from where they are standing, with the skids at eye level and the model facing into wind. The model now moves forward at the normal hovering pace for five metres, stops and hovers briefly. then climbs vertically for two metres before briefly hovering again. The pilot will now hover the model forward for ten metres so that the model passes the pilot sideways on to them as they face crosswind. The model again hovers briefly and the pilot now causes the model to descend two metres until the skids are once again at eye level where it again hovers briefly. The model now moves forward for another five metres which concludes the manoeuvre.
The model, still with skids at eye level, must then be hovered back to the landing pad and landed smoothly and steadily.
The speed during the top hat should approximate to a normal walking pace, and the heading is constant throughout. The entry and exit to the manoeuvre is a test of the pilots ability to correctly position the model. The model should not drift away from or toward the pilot significantly and the model should be under accurate control for the whole manoeuvre.
(d) Take off and climb to a safe altitude.
The pilot will at this point be standing downwind of the model and must ensure that the route of his proposed flight path is clear before taking-off; watch for head movement as they scan the area. On taking-off, the helicopter will lift to a brief hover at about half a metre high. After again checking for obstacles and obstructions the pilot then climbs out at an angle greater than 45° to his selected safe height. When reaching this height the model can be transitioned into forward flight and the pilot can now position it for either a left or right hand circuit as he pleases.
During the climb out you will be looking for a positive approach to the manoeuvre, a constant angle and velocity. the pilot will also be looking for other traffic along the intended route.
(e) Fly a left hand circuit.
(f) Fly a right hand circuit.
The pilot will now be positioned facing crosswind and can elect to fly these manoeuvres in either order. The circuits may be of any type the pilot desires i.e., racetrack, circular or rectangular. the longest legs of the circuit must extend over at least fifty metres. It is important that the initial turn on each circuit is made away from the flightline and the model must never pass behind the pilot. The direction of the first circuit flown should therefore be chosen to allow this turn away and whether this is left or right will depend upon the wind direction.
On the run in to the first circuit and on completion of it, the model will be flying into wind past the front of the pilot, and, for safety reasons, twenty or thirty metres out from the take off pad. Tell the candidate prior to the flight the line you wish them to follow.
You must ensure that the candidate is clear on this , the line will be set by the model flying in front of them on a heading which will be agreed before the flight, usually , but not always, into wind, and passing over a set point. The first pass in front of the pilot is extremely important as it sets the standard height and line for the rest of the ‘flying’ manoeuvres.
(g) Perform a stall turn.
With the pilot still facing crosswind the model should be flown in from downwind, on standard height and line, across in front of them to a point between thirty and fifty metres upwind. The model should then be pulled into a near vertical climb. At the top of the climb the model must stop (still pointing upwards) before being turned 180o about it’s vertical axis (a half pirouette). The model should descend approximately down the same path in a diving attitude and should pull out of the dive and exit the manoeuvre at about the same height as it started but on a reciprocal heading. The model should not be allowed to skew off it’s intended route, and should be corrected if it does. Clearly, wrong control inputs in this instance will indicate a lack of competence at the required level.

(h) Perform one twenty second nose-in hover.
The model must now transition from forward flight to the hover in a safe and steady manner and position for the nose-in hover. It is not specified whether this manoeuvre is performed into wind or crosswind so the pilot may choose.
If performed into wind, the pilot should turn to face the wind and should position the model into wind over the landing pad, hovering at a height of between eye level and up to three metres. After a brief hover, the model is turned through 180o and held steadily in the nose-in hover for at least 20 seconds, then turned back into wind and, after a brief hover, climbed away and transitioned to forward flight.
If performed crosswind, the pilot should be facing crosswind and should position the model hovering into wind about five to ten metres in front of them (the pilot will be looking at the model side-on in this position). After a brief hover, the model is turned 90o towards the pilot and held steadily in the nose-in hover for at least 20 seconds, then turned back into wind and, after a brief hover, climbed away and transitioned to forward flight.
Whichever way the manoeuvre is performed, when the model is in the nose in position the tail boom should not be visible to the pilot. If the model is not completely nose in you should ask the pilot to correct it’s position before starting the twenty second count. The helicopter should not drift significantly in any direction and height control should be good.
(i) Perform one double stall turn.
Note that the stall turns must be performed with opposite rotation i.e. first one to the left, second one to the right or vice versa.
This manoeuvre is flown as one continuous element with the pilot facing crosswind. The first element is exactly as for the single stall turn as described in (g). The second element is flown after the model has flown back down its original entry path and is performed approximately as far downwind of the pilot as the first element was upwind. Again, the description of the second element is exactly as for the first except that the pull-out and exit from the manoeuvre takes the model back along its original entry path to the manoeuvre.
Both of the stall turns should be away from the flightline. That is, if the initial entry to the manoeuvre is from the left to the right of the pilot, the first stall turn will be to the left and the second stall turn will be to the right (fly it with your hands and all will become clear)
You should look for accurate positioning of the model between the stall turns, that is at a constant height and along the same line.
(k) Perform an approach at 45° to the vertical, landing within a pre-determined two metre square.
It is difficult to judge the angle of descent unless the model is sideways on to the pilot. For this reason the pilot should move diagonally back from the position he has taken during the rest of the test and should stand so that the landing pad is about ten metres crosswind from them.
It is not a requirement that this manoeuvre should be entered from full forward flight so the pilot may set up the model in a steady hover or be moving forward in steady hovering flight at a minimum height of fifteen metres and downwind of the landing pad. The model should then sink at a constant rate with constant forward movement at an angle near to 45o, heading down towards the landing pad. Finishing this descent exactly over the landing pad is not required but the model should be no more than a metre or so out. The candidate is allowed a short hover at a height of around half a metre to make corrections before settling the model on the ground.
After landing, the candidate should shut down the engine and allow the rotor blades to stop turning before collecting the model to return to the pits.
(l) Complete post flight checks as required by the BMFA Safety Codes.
These are clearly set out in the BMFA handbook.


